Timeline tab
This topic describes the Timeline data tab on the Data view, which by default is located at the bottom of the ESPA analysis center screen.
This feature requires option E4 Phone data/analytics. If you do not have this option this tab is not available.
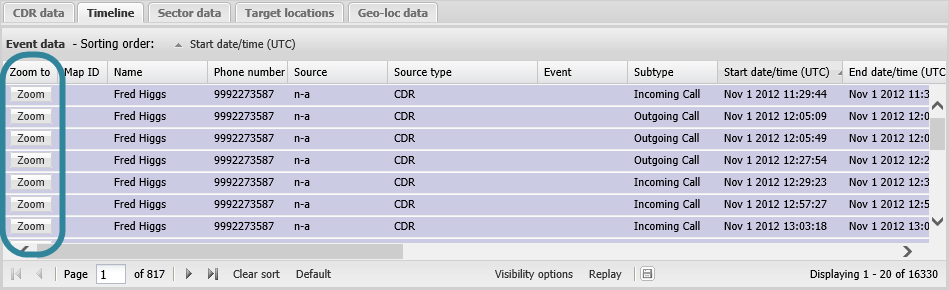
The Timeline tab displays, in UTC time order, the information from the uploaded CDR files, phone data files, geo-location files and the target locations. Only the phone data information and target locations that contain a time are displayed. The records are shown in the color you have selected for each phone number using the Color selector.
There may be some CDR records that cannot be placed in the timeline in UTC time order. These records are therefore all displayed at the end of the timeline in local time order and are highlighted in pink. The reason these CDR records cannot be placed in UTC time order is that the time zone of the record is not known to OSS-ESPA. Typically this occurs when a CDR record provides the time in the local format but the latitude and longitude, or cell identifier of the record is not available making it impossible for OSS-ESPA to calculate the UTC time.
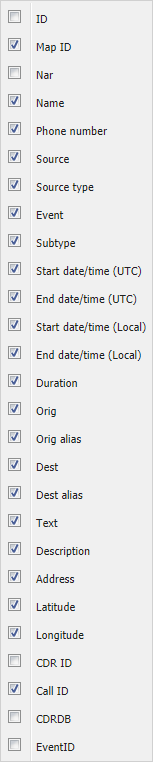
You can select to display different types of time line data in this tab as shown in the graphic below.
For further information on using the zooming, filtering, grouping and sorting features on this tab refer to Using basic features of the data view.
To allow you to investigate more easily the locations of the time line events click Zoom to. This displays the selected event in the center of the map. Zoom to is only displayed for events that have a latitude and longitude.
If the event you zoomed to is from a:
- CDR file then the map centers on the sector. The sector is only displayed on the map if the sector map layer is selected. For further information refer to Viewing different map layers.
- phone data file then the map centers on a star. The color of the star is dependent on the color you set for the phone number the phone data file was uploaded for. The event is only displayed on the map if the events map layer is selected. For further information refer to Viewing different map layers.
- target location then the map centers on the target location icon. The target location icons are only displayed on the map if the target location map layer is selected. For further information refer to Viewing different map layers.
Displays the identifying number for the event. This number is also displayed on the map, allowing you to easily correlate the event on the map with the event on the Timeline tab.
Displays the phone user's name as entered on the People and devices screen.
Displays the phone user's phone number as entered on the People and devices screen.
Displays the source as either you selected or was automatically detected by OSS-ESPA on the Manage files screen.
Displays where the time line event comes from, either:
- Target location: this indicates the event is from a target location which includes a time.
- CDR: this indicates the event is from a CDR file.
- Cellebrite: this indicates the event is from a Cellebrite phone data file.
- XRY: this indicates the event is from an XRY phone data file.
- Geo-location: this indicates the event is from a geo-location file that you uploaded or that was uploaded automatically by live location monitoring.
Displays what type of event. What is displayed here is dependent on the Source type, for example:
- CDRs display either: SMS or Voice.
- Cellebrite and XRY display either: Call, Location, SMS, MMS, Email, or Calendar event.
- target locations display only target location.
- Geo-locations only display Geo-location.
Displays the subtype of the event. For example:
- target locations may display: Crime scene, Residence, Frequented area, Meeting area or Other.
- CDRs may display : "Incoming call" or "Outgoing call".
- Cellebrite or XRY may display: "Wifi networks" or "Cell tower" for location events, or "Inbox" or "Sent" for SMS events.
- Geo-locations display either: License Plate Reader, GPS Ping, Live Ping, or GPS Tracker.
Displays the UTC date and time that the event started.
There may be some CDR records that cannot be placed in the timeline in UTC time order. These records are therefore all displayed at the end of the timeline in local time order and are highlighted in pink. The reason these CDR records cannot be placed in UTC time order is that the time zone of the record is not known to OSS-ESPA. Typically this occurs when a CDR record provides the time in the local format but the latitude and longitude, or cell identifier of the record is not available making it impossible for OSS-ESPA to calculate the UTC time.
Displays the UTC date and time that the event ended.
There may be some CDR records that cannot be placed in the timeline in UTC time order. These records are therefore all displayed at the end of the timeline in local time order and are highlighted in pink. The reason these CDR records cannot be placed in UTC time order is that the time zone of the record is not known to OSS-ESPA. Typically this occurs when a CDR record provides the time in the local format but the latitude and longitude, or cell identifier of the record is not available making it impossible for OSS-ESPA to calculate the UTC time.
Displays the local date and time that the event started.
There may be some records that do not display a local time. This is because the uploaded phone data file supplied the time as a UTC time and there is no location information therefore making it impossible for OSS-ESPA to calculate the local time.
Displays the local date and time that the event ended.
There may be some records that do not display a local time. This is because the uploaded phone data file supplied the time as a UTC time and there is no location information therefore making it impossible for OSS-ESPA to calculate the local time.
Displays the complete time of the event.
If available this displays, depending on the event type, either the phone number, email address or user identifier that originated the event. The user identifier is what the user is known by on applications such as Skype and Facebook.
If available this displays all contact alias names for the user who originated the event. These alias names are from the uploaded phone data files.
If available this displays, depending on the event type, either the phone number, email address or user identifier that was in receipt of the event. The user identifier is what the user is known by on applications such as Skype and Facebook.
If available this displays all contact alias names for the user who received the event. These alias names are from the uploaded phone data files.
What this displays is dependent on the type of event. For example:
- target locations: display the location name.
- CDRs may display: the SMS message.
- Cellebrite or XRY may display: the file name of an image or video, the instant message text, the email subject, the global cell identifier, or the WiFi MAC address.
If available this displays more detailed information, such as the target location description.
If available this displays the address, such as the target location address.
If you have previously changed the tab's: column visibility settings, column order, column filters, sorting, and grouping then these are saved for the next time you open the ESPA analysis center screen. To restore them to their default condition click Default.
Click to open the Timeline options dialog box which allows you to show or hide events without locations or show only the phone data file events.

Click to export a .csv file of the time line data. This.csv file is not identical to the combined CDR file you uploaded and the phone data files you uploaded, the differences are that this one:
- only contains the call records and phone data records for the time period set in the Date filter.
- only includes phone data records with latitude and longitude.
- does not contain data calls unless you have selected to include them in the Advanced options dialog box.
- it also contains target locations which have times associated with them.
This is identical to clicking Export timeline to CSV in the map view to export the .csv file.
Click Replay to step through the records that are selected on the current page of this tab. The replay feature is available on the CDR data, Timeline, Geo-loc data and HO data tabs. When selected on the:
- CDR data tab, the sectors used for each call selected on the current page of this tab are then stepped through and highlighted one at a time on the Map view.
- Timeline tab, the events selected on the current page of this tab are then stepped through and highlighted one at a time on the Map view. The events are: sectors for CDR events, stars for phone data events, and location icons for any locations you entered which had associated times.
- Geo-loc data tab, the geo-locations selected on the current page of this tab are then stepped through and highlighted one at a time on the Map view.
- HO data tab, the originating, terminating and handover sectors selected on the current page of this tab are then stepped through and highlighted one at a time on the Map view.
To stop during the sequence click Replay again. This feature allows you to easily view the location of the calls and events over time giving you an idea of the phone user's movements. If you want to change the speed of the replay feature use the Pause time (seconds) on the Replay tab of the Advanced options dialog box.